Orthograde use of MTA (mineral trioxide aggregate) to Save Teeth
MTA is a remarkable material.
MTA (mineral trioxide aggregate) is a remarkable material used in dentistry. Its ability to create a great seal and to promote hard tissue deposition has lead to various uses in endodontics, but I would advise that any dental office (general and especially pediatric) have this material available. Perhaps most commonly known or used for micro-surgical endodontics (apicoectomy), it is also the best material for pulp capping, repairing resorptive defects, repairing perforations and apexification/apexogenesis procedures.
In this week’s blog post I would like to cover the clinical applications and technique of apexification uses with MTA. I will post cases that we have done in our office to place MTA orthograde and to the apex of the root. This will make use of the two properties mentioned above: 1. Provide an excellent apical seal, and 2. Promote hard tissue formation around the apical tissues.
Let me provide a simple definition of terms. Orthograde is the use of this material through the coronal access point vs. retrograde which is the use of the material from the apex of the tooth as in the example of apicoectomy.
In our office we will tend to place orthograde MTA more often for younger patients on anterior teeth with large or “open” apices. It certainly does not always have to be young patients as we do see older patients with “open” apices as well. It is just that it is more common to see a younger patient vs. an older patient with a malformed root end. The point is that in just about all cases in which we will place orthograde MTA is when the apex is “open”.
As you can image fitting a gutta percha cone to a well tapered apical shape of perhaps 25, 30, 35, etc will result in a predictable obturation with gutta percha and sealer. In ideal conditions of apical shape we can compact the gutta percha master cone with a warm vertical compaction method. The apical taper of the canal and the snug fit of the master cone will limit any expression of the gutta percha outside of the apex. But if in the situation with an “open” apex without apical taper that compaction technique with gutta percha and sealer will result in over-extension of the gutta percha material. In these cases, the concept of shape and taper, and compaction forces will determine the material that should be used (gutta percha vs. MTA). (see figure 1) Thus, changing the obturation method and using MTA makes the most sense. Especially considering that we do achieve the improved seal and do promote bone formation/deposition. (see figure 2,3,4 of the lower canine)
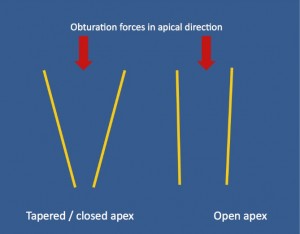
Figure 1
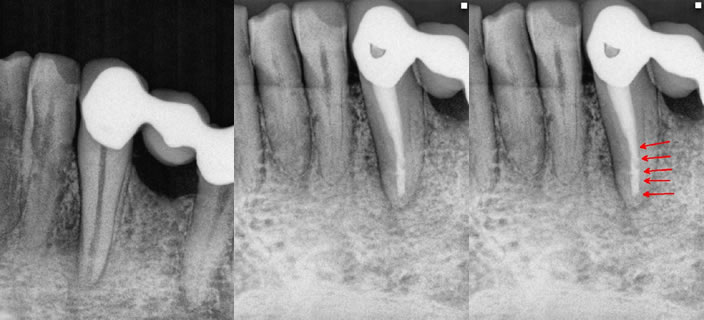
Figure 2: Pre-op radiograph with an apical lesion and an “open” apex. A very important canine tooth and part of a bridge. Figure 3: The immediate post-op following 2.5 months of CaOH treatment. Figure 4: Red arrows indicating the MTA location with gutta percha packed on top of the MTA. There is already a noticable healing response occuring apically as well.
I want to also point out that even though we usually will find anterior teeth in need of this technique there are certainly conditions of posterior teeth that will benefit from orthograde MTA obturation.(see figure 5,6) There can be a host of issues that can create the “open” apex posteriorly such as youth of the patient (immature apex) (see figure 7), resorptive conditions of the apex (figure 8), or simply retreatment scenarios in which the original RCT resulted in a ‘blown-out’ apex from over aggressive instrumentation (figure 9). While the concept remains the same, the treatment can be a bit more difficult simply because of location of the teeth in the posterior and the possibility of some curved canals not seen with anterior teeth.
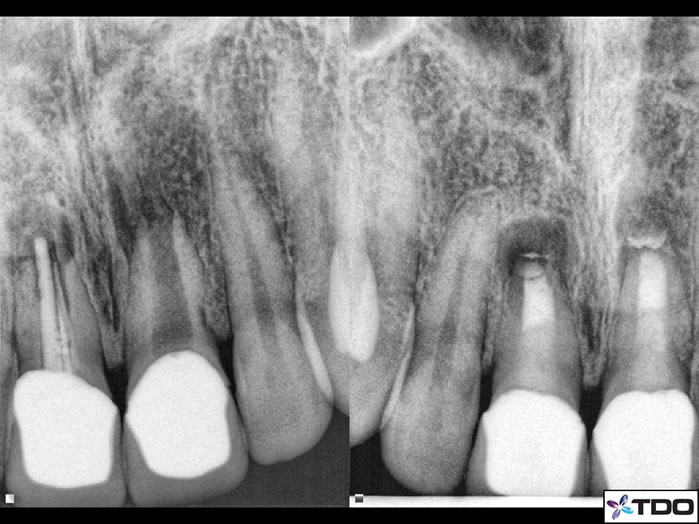
Figure 5: This case was just finished by Dr. Sherman. The pre-op shows wide open apices with tooth #8 having received inadequate original endodontic treatment. Tooth #9 is necrotic with incomplete apical formation. MTA is packed in the apical 4mm and a bonded fiber post over the top of the MTA.
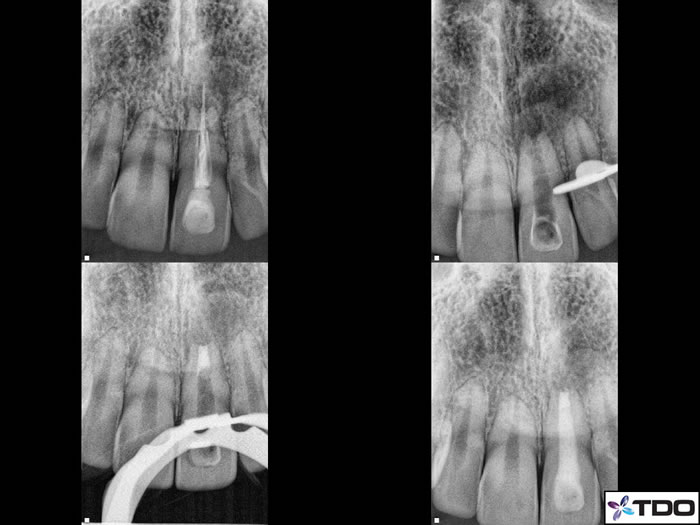
Figure 6: I completed this case a couple years ago. the pre-op with over instrumented and over filled RCT in the upper left. The upper right is with all materials removed. The lower left is with MTA in the apical section. And the lower right is the completed case with bonded post/composite seal.
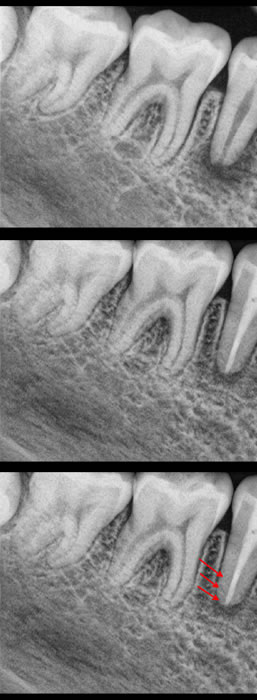
Figure 8: Root end resorption on a necrotic case. Following proper canal disinfection I packed MTA in the apical 4mm (red arrows). I then placed gutta percha in the rest of the canal and sealed coronally with composite.
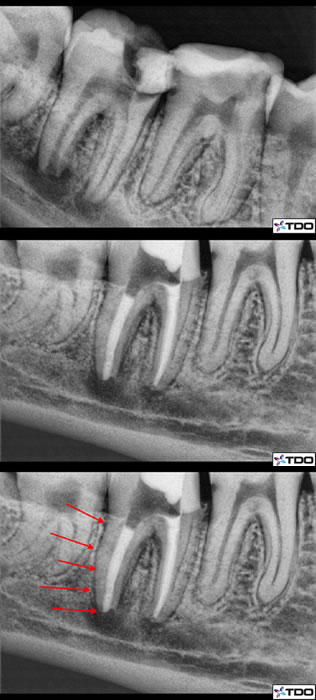
Figure 7: Here is a case of Dr Monroe in which he had to perform RCT on an immature apex. The distal root is far too open to place gutta percha and thus he filled the entire distal root with MTA (red arrows).
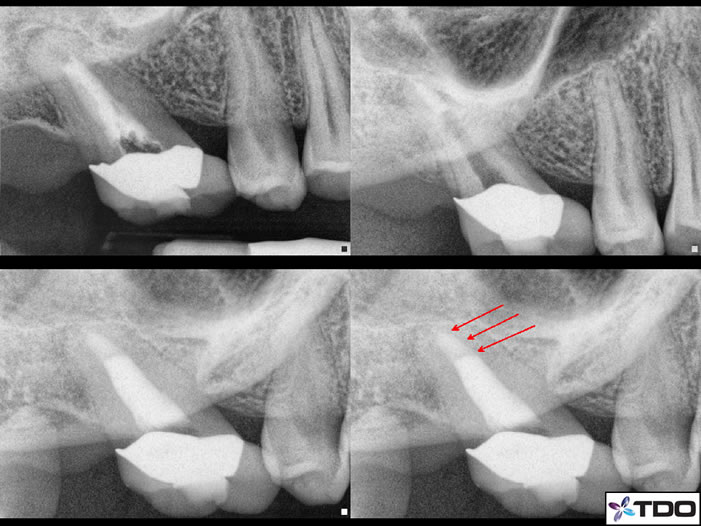
Figure 9: Retreatment case done by Dr. Monroe with very large apical diameter. This case is best suited to be obturated with MTA which Dr. Monore used. The upper left is the pre-op condition with a very short filled canal system. The upper right is the MTA packed at the apex.The lower left is the MTA with gutta percha over the MTA. The lower right is with red arrows showing placement of the MTA.
Technique of orthograde MTA placement:
1. Once the canal system is properly disinfected and dried an accurate length confirmation or reconfirmation if that has already previous been determined. We will typically use a large piece of gutta percha fit to the proper length and take a radiograph.
2. Mix the MTA and using any number of applicator instruments place the first pack of material into the orifice of the canal.
–do not need to use more than a couple mm’s of material so that it is easier to pack deeply. Using too much material will make the packing at the apex more difficult. It is safer to error on the side of using too little which will make apical packing easier. You can always add more incrementally.
3. Using an endodontic condenser pre-measured to be within 0.5-1mm of the working length pack the MTA towards the apex.
4.0At this point careful condensation of the material near the apex working length is critical so as to get a good compaction of material yet not push the MTA through the open apex.
–any various instruments can be used for this precision of MTA placement such as paper points, ultrasonic agitation of the material (creates sort of a wet sand flow effect), larger hand-files that have been flattened at the tip. We will use all of these ways to achieve the right obturation. But all instruments used need to be properly measured.
5. Take a radiograph of the first pack of MTA to make sure the material is at the correct location apically.
6. If deeper compaction is required based on the radiograph then precede packing deeper and take another x-ray. If the location is correct then incrementally pack more MTA towards the apex until about 4-5mm of MTA is placed.
7. Fill the rest of the canal with material of choice such as a post/core or gutta percha directly onto the MTA.
(see figures 10/11/12/13)
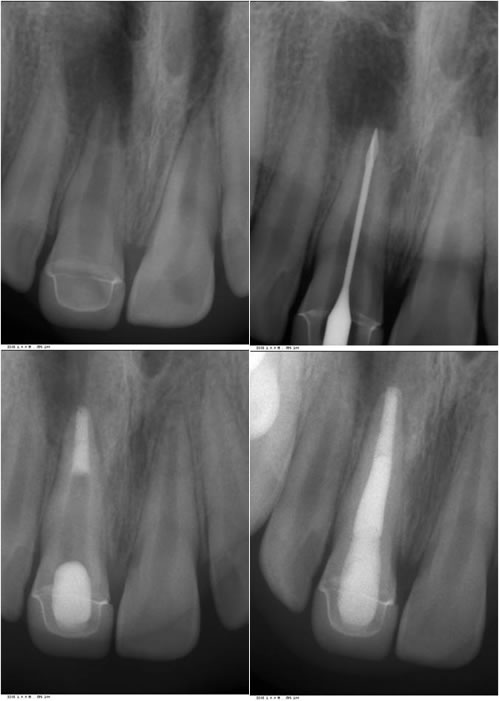
Figures 10,11,12,13: In these figures you can see the pre-op radiograph, the length confirmation used in this case is a gates gliddel because the apex is so large, the MTA fit in the apical 5mm, and the completed case with gutta percha over the MTA and a composite seal of the access point.
Thanks for visiting Tri City Micro Endodontics.
