Apical Instrumentation Mishaps / Complications
We win and lose our root canal battle in the apical third of a root.
In other words, to a large extent success and failure of our treatment is dependent upon how skillful we are in our approach to instrumentation and obturation of this root segment. There are many contributory factors to this concept of which I will list a few.
1. It is the site furthest from our fingers and thus we have the least amount of control over the files.
2. Infected or inflamed tissue is easier to be left behind in the apical third.
3. It is the narrowest aspect of the canal system.
4. 95% of lateral / accessory anatomy exists in this apical third.
5. Anatomical variance is most significant in this segment consisting of apical canal splits or tight curvatures.
6. Accurate measurements and accurate instrumentation (within 0.25 of a millimeter) is critical.
7. Accurate obturation is critical.
The 7 factors listed above really come down to proper control and accuracy. Comparatively though the coronal third of the canal often is the easiest part of the instrumentation process. Once the orifice is discovered and assuming calcification is not extreme then there is much less risk of instrumentation complications. This coronal segment is more visible which allows for better instrumentation control and precision. Additionally, this segment has more predictable and recurring anatomical features from tooth to tooth. This is not to imply any careless approach to the coronal third is acceptable; rather I just want to make a comparison of the two locations. Thus you can better appreciate the concept of why endodontic treatments are “won and lost in the apical third”.
Knowing this apical segment demands a more technical approach I thought it would be helpful to review three of the more common instrumentation complications that can lead to lower success rates; zipping, perforating, and ledging. I then would like to give some simple advice to help avoid these mishaps. One thing to point out though is that all three of these complications are the result of not maintaining the natural or original canal curvature. So keep in mind that the natural canal curvature or location must be the focus of apical instrumentation. Let me start with their definitions.
When we are preparing a canal system we will always slow down the process with both our technique and perhaps more importantly the mental approach.
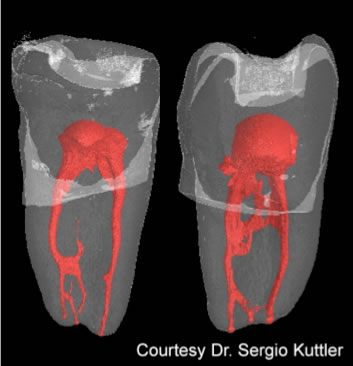
Ledging is the defined most simply as creating a divot in the canal wall with the files. This would usually result from overly aggressive use of a hand-file. It can also result from not pre-bending a larger hand file like an ISO size 15 or size 20+. The file of course wants to be straight and thus the divot in the canal wall will occur on the outer wall of the curvature (see figure 1). This will also occur as a result of atypical apical anatomy. (See figure 2) Any quick or acute curvatures or division of the main canal space into multiple apical deltas can lead to the file tip’s driving forces gouging the lateral wall rather than maintaining the original canal shape. To see this in real time in a video under magnification you can visit this website http://www.tulsadentalspecialties.com/default/education/demos.aspx. There are many really great short videos for endodontic education on the right side that you can scroll through, all of which you will find helpful. But find the video titled “Pathfile glide path demonstration #2”. This video shows a size 20 hand-file slowly start to create a divot or ledge on the outer curvature of the apical segment of the root. I would claim that this ledge is minimal, but in less than 1 min and with a slow filing technique you can see the ledge form. Imagine what occurs over a few minutes with a more aggressive filing technique. This brings us to the next concept.

Figure 2: Micro CT scan of a lower molar mesial root showing the complex anatomy of this canal system. This is actually typical
anatomy of a root canal system.
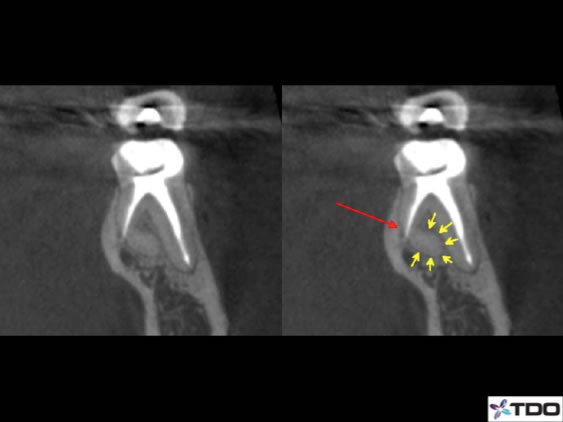
Perforating is a common enough term that requires the least explanation. But let’s focus on perforating the canal system in specifically the apical third. We can best describe an apical perforation as the next step in a severely ledged canal. In other words if the ledge is not properly managed and if the file continues to gouge the dentin wall then it will soon make its own pathway and create a separate portal of exit (see figure 1 and figure 3). Once an apical perforation has been created in a curved canal it is very difficult to reenter the original canal space for shaping and obturation. All subsequent files in the instrumentation process will simply take the pathway with the least curvature which will be towards the perforation. Overcoming apical perforations often leads to an apicoectomy procedure to simply remove this apical root segment.

Figure 3: This is a coronal slice view of the DL canal of a lower molar with severe curvature towards the buccal. A perforation is detected at the elbow of the curvature.
Zipping is best described as a ledging effect that simply happens to be directly at the apical foramen. In a zipped canal the gouging effect of the file upon the dentin occurs at the canal terminus at the external surface vs. the gouging effect internal to the canal system in a ledged situation. Therefore a zipped foramen has a larger apical diameter than the original uninstrumented foramen (see figure 1). Again think of a file wanting to be straight and thus the pressure of the file at the apex is directed to the outer wall of the curvature. When the filing technique is aggressive and over-extended then the originally narrow foramen enlarges as file removes the dentin along the outer wall of the curve (see red arrow in figure 1).
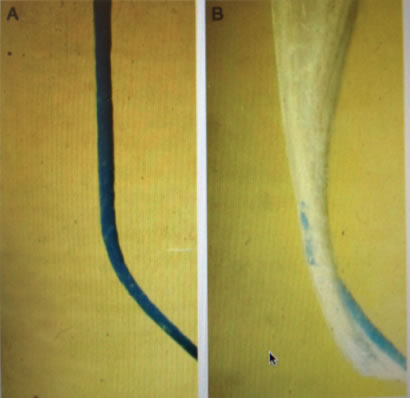
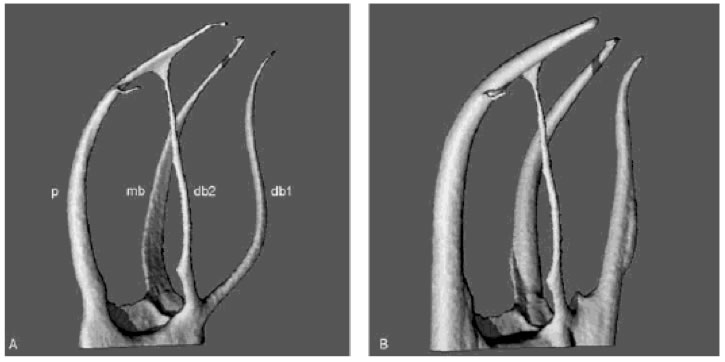
Detailed management of these three mishaps will call for a separate blog post. But you might not be surprised that the best management is the prevention of their occurrence entirely. My advice would be to focus on creating a smooth, easily managed, and reproducible glide path to the accurate working length. I feel most mistakes start when a “supposed” glide path is not actually smooth and it is not easily reproduced or recapitulated with the hand-files. I sense there is a strong desire to want to jump into rotary instrumentation too quickly. We suggest slowing the process down and starting with small hand-files like a size ISO 6 and 8 before the more common and heavily used 10 or 15 files. Less damage can be created with the small files and they tend to scout a canal better, giving you a sense of where you might feel a potential hang up. Furthermore, I would also suggest that rotary files should be used for just about every case. I realize that man educators and text books will advocate exactly the opposite, which is to say that hand-filing is safer than rotary. And I understand there are unique cases that require hand-filing to larger sizes, and some cases were rotary does not work well at all. There are exceptions to just about every clinical situation. But it has been shown in many studies that hand-filing is an overly aggressive technique with even files as small as ISO 20. Comparatively, rotary files of a same apical size (i.e. an F2 red ProTaper Universal—tip size 25 as compared to an ISO 25 hand-file) are much less invasive, preserve original canal pathways and have less iatrogenic mishaps as compared to hand-files. I would maintain this claim for any file comparison from a size ISO 20 and up. See figure 4 showing the original canal in blue on the left and the same canal on the right following only a hand-filing technique to an approximate size of 35. The apical ledging and zipping is significant. A rotary file would not produce these results as you see in Figure 5 which shows the original canals on the left and well prepared canals with rotary ProTaper Universal files on the right. There is uniformity of the canal shaping along the entire pathway (minus the MB2 which is unprepared). Essentially what I feel is that using hand-files of size ISO 20 and larger are more technique sensitive than rotary instrumentation.

Figure 4

Figure 5: Peters et al, IEJ, 2002
I also would suggest in tighter or more curved canals to pre-bend hand-files and also consider using a PathFile rotary file sequence made by Tulsa Dental. It is a remarkable rotary file that has unparalleled flexibility. Once a true glide path has been created up to a 10-15 hand-file, the PathFile simply cannot create any of the above described apical mishaps.
Ultimately keep in mind that root canal success is often “won and lost in the apical third”. Remember to slow down both the physical instrumentation and the mental approach when moving into this root section. I truly feel you will find endodontics to be more predictable and more enjoyable this way.
Thanks for visiting us at Tri City and Fallbrook Micro Endodontics of San Diego, CA.
